Sunday, November 17, 2024

Step-by-Step 8x12 Storage Shed Plans for Storing Tools and Gear

Step-by-Step 8x12 Storage Shed Plans for Storing Tools and Gear

Comprehensive Plans for an 8x12 Storage Shed: Tool and Gear Organization

This document provides detailed plans for the construction of an 8x12 foot storage shed, specifically designed for the efficient and organized storage of tools and outdoor gear. The design prioritizes durability, functionality, and ease of construction for the moderately skilled DIY enthusiast. While modifications are possible, these plans provide a solid foundation for your project.

I. Foundation and Site Preparation

A stable foundation is crucial for the longevity of any shed. This design utilizes a concrete slab foundation, offering superior durability and protection against moisture. Alternative foundations, such as gravel pads or pier and beam systems, may be considered depending on site conditions and personal preferences, but are not detailed here.

A. Site Selection and Preparation

Before commencing construction, careful site selection is paramount. Choose a level location with adequate access for delivery of materials and sufficient drainage to prevent water accumulation around the shed. Clear all vegetation, debris, and any existing obstacles from the designated area. Mark out the 8x12 foot footprint accurately using stakes and string.

B. Excavation and Formwork

Excavate the area to a depth of approximately 6 inches to accommodate the concrete slab and a layer of compacted gravel base. The excavation should extend slightly beyond the marked footprint to allow for formwork. Construct the formwork using pressure-treated lumber, ensuring that it's plumb and square. The formwork should be at least 4 inches high. Reinforce the formwork with stakes driven into the ground to maintain stability during concrete pouring.

C. Gravel Base and Concrete Pour

After the formwork is in place, create a compacted gravel base of approximately 2 inches in depth. This helps to provide drainage and a level surface for the concrete. Once compacted, pour the concrete, ensuring it’s evenly distributed and vibrated to eliminate air pockets. Allow the concrete to cure according to the manufacturer's instructions, typically 2-3 days before proceeding with the shed construction.

II. Framing the Shed

The framing forms the skeletal structure of the shed, providing support for the walls, roof, and cladding. This section outlines the process of building a robust and durable frame using pressure-treated lumber.

A. Floor Framing

Construct a floor frame using 2x6 pressure-treated lumber, creating a grid pattern with joists spaced at 16-inch intervals. Ensure the joists are securely fastened to the concrete slab using anchor bolts or concrete screws. Lay plywood sheathing over the joists, securing it with appropriate nails or screws to create a solid and level floor surface.

B. Wall Framing

Construct the wall frames using 2x4 pressure-treated lumber, creating 24-inch on-center stud spacing. For the 8-foot walls, use eight studs, creating a structure that can support the roof and wall cladding. Ensure proper bracing and ensure that the frames are square and plumb before proceeding. The height of the walls should be planned in accordance with local building codes and desired ceiling height.

C. Roof Framing

Construct a simple gable roof for optimal drainage and snow shedding. Use 2x6 rafters, spaced at 24-inch intervals, to support the roof sheathing. Calculate the rafter length accurately to ensure proper pitch and overhang. A suitable pitch for this shed would be around 4:12 (4 inches of rise for every 12 inches of run). Construct roof trusses or use prefabricated trusses for added strength and simplicity. Consider the weight of snow in your region when determining rafter size and spacing.

III. Sheathing and Cladding

This section details the application of sheathing and cladding materials, ensuring weather resistance and aesthetic appeal. The choice of materials will affect both the cost and the overall appearance of the shed.

A. Wall Sheathing

Apply OSB (Oriented Strand Board) or plywood sheathing to the exterior walls, ensuring proper overlapping and nailing according to the manufacturer's instructions. This sheathing provides a solid surface for the exterior cladding and adds structural integrity to the walls.

B. Roof Sheathing

Apply OSB or plywood sheathing to the roof rafters, ensuring proper nailing and alignment. This forms a solid surface for the roofing material. Consider using roofing felt or waterproof membrane underlayment before installing the final roofing material. This will prevent moisture penetration.

C. Exterior Cladding

The choice of exterior cladding is largely a matter of personal preference and budget. Options include vinyl siding, wood siding, metal siding, or even shiplap. Install the cladding according to the manufacturer's instructions, paying attention to overlapping and sealing to ensure weathertightness. Ensure proper ventilation to prevent moisture buildup within the walls.

D. Roofing

Install the chosen roofing material over the roof sheathing and underlayment. Options include asphalt shingles, metal roofing, or even rubber roofing. Ensure proper flashing around vents, chimneys (if applicable), and other penetrations to prevent leaks. Follow the manufacturer's instructions carefully for proper installation.

IV. Doors, Windows, and Finishing Touches

This section details the installation of doors and windows and the addition of finishing touches to complete the shed.

A. Door Installation

Install a sturdy, weatherproof door of appropriate size for easy access to the shed. Ensure proper framing and sealing around the door to prevent drafts and moisture intrusion. Consider adding a lock for security.

B. Window Installation (Optional)

If desired, install windows for natural light and ventilation. Choose windows that are weather resistant and secure. Proper flashing and sealing are essential to prevent leaks.

C. Interior Finishing

Consider adding interior sheathing, such as plywood or drywall, for a cleaner finish and enhanced insulation. Paint or stain the interior walls as desired. Install shelving and storage solutions to maximize space and organization.

D. Exterior Finishing

Once the exterior cladding is installed, consider adding finishing touches such as trim, gutters, and downspouts. Ensure proper drainage away from the shed foundation. A coat of paint or sealant will protect the exterior and enhance its aesthetic appeal.

Disclaimer: These plans are for informational purposes only. Always consult with local building codes and obtain necessary permits before commencing construction. Seek professional advice if needed, particularly for complex aspects of the construction process. Improper construction may lead to structural failure or safety hazards.
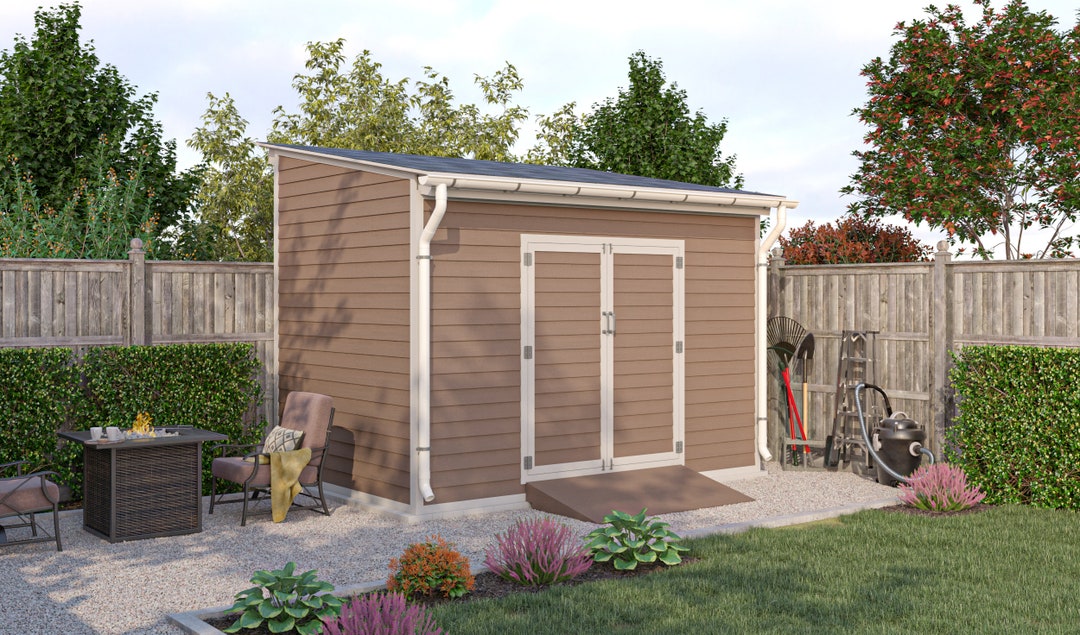
Practical 8x12 Lean-To Shed Plans for Garden Storage

Practical 8x12 Lean-To Shed Plans for Garden Storage

Practical 8x12 Lean-To Shed Plans for Garden Storage

This document provides comprehensive plans for constructing an 8x12 lean-to shed, ideal for garden storage and equipment. The design prioritizes practicality, affordability, and ease of construction, suitable for DIY enthusiasts with basic carpentry skills. The detailed specifications outlined below will guide you through each stage of the building process, from foundation preparation to final finishing. Careful adherence to these plans will result in a durable and aesthetically pleasing structure capable of providing years of reliable service.

I. Foundation and Site Preparation

A solid foundation is crucial for the longevity and stability of any shed. The lean-to design, while simpler than freestanding structures, still requires careful site preparation and a robust base.

A. Site Selection and Leveling

Choose a level area, preferably near the house or existing structure to which the shed will be attached. Ensure the selected location receives adequate drainage to prevent water accumulation around the shed’s base. Use a level and string line to accurately determine the high and low points of the chosen area. Excavate and compact the soil as needed to achieve a perfectly level surface. Consider adding a layer of gravel for improved drainage and stability.

B. Foundation Construction

For an 8x12 lean-to shed, a concrete slab foundation offers the best stability and longevity. This involves excavating a trench approximately 4 inches deep across the shed’s footprint. A compacted gravel base, approximately 2 inches thick, should be laid within the trench to ensure proper drainage. Construct forms using treated lumber to contain the concrete pour. Reinforce the concrete with wire mesh for increased strength. Pour the concrete, ensuring it's level and adequately compacted. Allow the concrete to cure completely (at least 7 days) before proceeding to the next stage.

Alternative: A compacted gravel base, while less robust than concrete, can be a suitable alternative in certain situations. This option requires a thicker layer of compacted gravel (at least 6 inches) to ensure adequate support. Consider using landscaping fabric underneath the gravel to prevent weed growth.

II. Frame Construction

The frame forms the skeletal structure of the shed. Precise measurements and careful assembly are critical for ensuring the shed's structural integrity and squareness.

A. Material Selection

Utilize pressure-treated lumber for the frame and base to withstand the elements. Choose dimensions based on local building codes and your desired strength; however, 4x4 posts and 2x6 for framing are generally suitable. For roofing, consider using plywood sheathing and appropriate roofing material (e.g., asphalt shingles).

B. Frame Assembly

  1. Construct the floor frame using 2x6 lumber, ensuring it’s square and level on the foundation.
  2. Erect the main side walls, attaching them securely to the floor frame and the existing structure. Use appropriate connectors for optimal strength and stability.
  3. Install the rear wall, making sure it’s plumb and aligned with the side walls. Ensure proper connections are made using appropriate fasteners.
  4. Build the roof frame, ensuring appropriate rafter spacing (typically 16 inches on center). The roof pitch should be sufficient for adequate water runoff.
  5. Securely connect the roof frame to the side and rear walls, paying close attention to bracing for strength and stability against wind load.

III. Sheathing and Roofing

Sheathing provides a solid base for the roofing material and also contributes to the overall structural strength of the shed.

A. Wall Sheathing

Apply plywood sheathing to the exterior walls, ensuring proper overlap and fastening to the framing. Consider using exterior-grade plywood for water resistance. Leave gaps for ventilation to prevent moisture buildup.

B. Roof Sheathing

Install plywood sheathing to the roof rafters, again ensuring proper overlap and secure fastening. The sheathing should be adequately braced to support the weight of the roofing material. Check local building codes for minimum requirements for wind and snow load.

C. Roofing Installation

Install your chosen roofing material, following the manufacturer's instructions. Asphalt shingles are a common and cost-effective option. Ensure proper underlayment is used to prevent leaks. Pay close attention to flashing around the edges and any penetrations.

IV. Doors and Windows

Doors and windows provide access and ventilation for your shed.

A. Door Installation

Install a sturdy exterior door appropriate for the shed's size and your needs. Ensure the door frame is properly aligned and securely fastened. Use weatherstripping to ensure a tight seal.

B. Window Installation (Optional)

Installing windows can improve ventilation and light within the shed. Select windows appropriate for exterior use and install them following manufacturer's instructions, ensuring proper sealing and weatherproofing.

V. Finishing Touches

Final finishing touches enhance the shed’s aesthetics and durability.

A. Exterior Finishing

Apply an exterior-grade paint or sealant to protect the wood from the elements. Choose a color that complements your home and landscaping.

B. Interior Finishing

Consider adding shelving and other storage solutions to maximize the shed's interior space. Paint the interior walls for a clean and organized appearance. Proper ventilation inside will also prevent moisture damage.

C. Safety Considerations

Always prioritize safety during the entire construction process. Use appropriate safety equipment, including eye protection, gloves, and hearing protection. Follow all safety guidelines when working with power tools and handling materials.

This detailed plan provides a comprehensive guide for constructing an 8x12 lean-to shed. Remember to always check local building codes and regulations before starting any construction project. With careful planning and execution, you can create a durable and functional storage solution for your gardening needs. Enjoy the process and the rewards of a job well done!

DIY 6x8 Shed Materials List: Everything You Need to Build

DIY 6x8 Shed Materials List: Everything You Need to Build

DIY 6x8 Shed: A Comprehensive Materials List

Building your own 6x8 shed is a rewarding project that allows you to customize your storage space and save money. Before you even think about breaking ground, however, you need a meticulous materials list. This guide provides a detailed breakdown, ensuring you have everything you need for a successful build. Remember, these quantities are estimates and might need adjustments based on your specific design and local lumber availability. Always double-check your measurements and add extra for potential cuts or mistakes.

Foundation & Framing

A strong foundation is critical for a sturdy shed. Consider your soil type when choosing your foundation method â€" concrete, gravel, or pressure-treated lumber are popular options. For this example, we’ll assume a pressure-treated lumber base. Framing forms the skeleton of your shed, providing support for the walls, roof, and doors. We'll use pressure-treated lumber for the foundation and floor joists to ensure longevity and resistance to rot and insects. The walls will be constructed using standard dimensional lumber.

Foundation Materials

  • Pressure-Treated 4x4 posts: 8 (for corner posts)
  • Pressure-Treated 2x6 lumber: Approximately 30 linear feet (for base framing)
  • Gravel or concrete: Quantity depends on your chosen foundation method and soil conditions
  • Concrete mix (if using concrete): Follow package instructions based on your foundation size
  • Post anchors (if needed): 8

Framing Materials

  • Pressure-Treated 2x6 lumber: Approximately 100 linear feet (for floor joists)
  • 2x4 lumber: Approximately 200 linear feet (for wall studs, roof rafters, and bracing)
  • Plywood or OSB sheathing (for floor): One sheet, at least ½ inch thick
  • Metal or wood connectors (joist hangers, corner brackets): As needed for your chosen design
  • Level: A reliable level is crucial for ensuring a square and plumb structure.

Exterior Cladding & Roofing

Choosing your exterior siding and roofing material is where you can add your personal touch. Common options include vinyl siding, metal siding, or even shiplap for a rustic look. For roofing, consider asphalt shingles, metal roofing, or corrugated plastic panels for cost-effectiveness and ease of installation. Remember to account for overhangs when calculating roofing material.

Exterior Cladding Materials

  • Siding of your choice: Calculate the square footage of your shed walls and add extra for waste.
  • Siding trim and accessories (fascia, soffit, etc.): As needed for your chosen siding type.
  • Exterior grade screws/nails: Sufficient quantity to attach the siding.

Roofing Materials

  • Roofing material of your choice (shingles, metal, etc.): Calculate the square footage of your roof, accounting for overhangs and adding extra for waste.
  • Roofing underlayment: Protects your shed from water damage.
  • Roofing nails/screws: Enough for your chosen roofing material.
  • Ridge capping, vents (optional): Enhance the look and functionality of your roof.

Doors, Windows & Finishing Touches

The final steps involve adding the door, windows, and any finishing touches. You’ll need to consider the size and style of your door and windows, ensuring they match your overall design. Remember to factor in the hardware for these components. Finishing touches might include painting, staining, or adding extra features like shelving.

Doors & Windows

  • Door (pre-hung or DIY): Choose a size that suits your needs.
  • Window(s) (pre-made or DIY): Choose size(s) and style(s) to complement your shed.
  • Door and window hardware (hinges, handles, latches): Ensure you have enough for all your doors and windows.

Finishing Touches

  • Paint or stain: Enough to cover the exterior surfaces of your shed.
  • Shelving (optional): Consider the storage needs of your shed.
  • Fasteners (screws, nails): A variety of sizes and types for different purposes.

This comprehensive list provides a solid starting point. Always cross-reference your specific shed plans to ensure you have all the necessary materials. Happy building!

Maximize Storage Space with These 8x12 Lean-To Shed Building Plans

Maximize Storage Space with These 8x12 Lean-To Shed Building Plans

Maximize Storage Space with These 8x12 Lean-To Shed Building Plans

An 8x12 lean-to shed, while seemingly modest in size, offers surprising potential for storage optimization when thoughtfully planned and constructed. This comprehensive guide explores the design considerations and construction techniques that will enable you to maximize the usable space within your 8x12 lean-to, transforming it from a simple structure into a highly efficient storage solution.

Planning for Optimal Space Utilization

Before commencing construction, meticulous planning is crucial to ensure efficient use of the available space. This involves careful consideration of the intended storage needs, the shed's orientation relative to sunlight and prevailing winds, and the selection of appropriate materials and construction techniques.

Assessing Storage Needs and Inventory

Begin by conducting a thorough inventory of the items you intend to store in the shed. Categorize these items by size, shape, and frequency of access. This will help determine the necessary shelving, racking, and storage solutions. Consider items like garden tools, lawn equipment, bicycles, sports equipment, seasonal decorations, or even workshop supplies. Knowing exactly what you'll be storing allows for a more tailored and efficient design.

Optimizing Shed Orientation

The shed's placement significantly impacts its functionality. Orient the lean-to to minimize direct sunlight exposure, particularly in warmer climates, to prevent overheating and potential damage to stored items. Consider prevailing winds; a strategically placed lean-to can provide natural ventilation, minimizing humidity and the risk of mold or mildew. Also, ensure easy access to the shed from your home or the intended area of use.

Material Selection for Maximum Space

The choice of building materials directly influences both the available space and the overall cost. Lightweight materials, such as pressure-treated lumber, allow for a more open interior space compared to heavier materials. Consider using engineered wood products like I-joists for floor joists and rafters to maximize load-bearing capacity while minimizing material thickness. This frees up valuable interior space. Opt for thinner wall sheeting materials to create a more spacious feel.

Design Strategies for Increased Storage Capacity

Clever design choices can significantly amplify the storage capacity of your 8x12 lean-to. Strategic shelving, efficient racking systems, and careful consideration of vertical space are all key elements in maximizing storage potential.

Implementing Multi-Level Shelving and Racking

Maximize vertical space by installing multi-level shelving units. Customize the shelf heights to accommodate items of varying sizes. Consider using adjustable shelving to adapt to changing storage needs. For heavier items, robust racking systems, such as those used for pallets or heavier equipment, will ensure stability and safety. Utilize wall-mounted shelving to free up floor space for larger items or easier movement.

Strategic Placement of Doors and Windows

The placement of doors and windows directly impacts the flow of movement and access within the shed. A single, wide door provides better access for larger items than a narrow door. Consider the location of windows carefully. While providing natural light, they can also reduce the available wall space for shelving. Proper planning helps balance light and storage needs. Sliding doors can also save space compared to traditional hinged doors.

Utilizing Loft Space for Overhead Storage

If the height permits, consider building a loft area for storing infrequently used items. This elevates less-frequently accessed items above the main floor area, leaving the floor space for regular use. A pull-down ladder or staircase provides safe access to the loft.

Construction Techniques for Space Optimization

Proper construction techniques are essential to realize the full storage potential of your 8x12 lean-to. Careful attention to detail during construction ensures structural integrity and maximizes usable space.

Building a Strong and Stable Foundation

A level and stable foundation is paramount. A concrete slab or a well-constructed pier and beam foundation provides a firm base. Ensure the foundation is properly leveled to prevent any settling that might compromise the shed's structural integrity and potentially damage stored items. The foundation size should be slightly larger than the shed footprint to prevent water accumulation around the base.

Optimizing Interior Wall Space

Avoid unnecessary interior wall studs. Properly spaced framing members provide ample support while minimizing interference with shelving and storage systems. Consider using wider studs for increased strength, reducing the number required for the same load-bearing capacity. This optimizes available wall space for shelving.

Insulation and Ventilation Strategies

Proper insulation helps to regulate temperature and humidity levels, protecting stored items from damage. Adequate ventilation is also crucial to prevent the build-up of moisture. Consider incorporating vents and installing a moisture-absorbing material to create a more stable and protective environment for storage. This proactive approach safeguards your stored goods.

Additional Tips for Maximizing Space

  • Utilize Vertical Space: Hang items from the ceiling or walls to free up floor space.
  • Employ Stackable Containers: Use uniformly sized containers for efficient stacking and organization.
  • Label Everything: Clear labeling makes finding items easier and improves overall organization.
  • Regular Decluttering: Periodically review stored items and remove anything unnecessary.
  • Use Wall-Mounted Hooks and Pegboards: These are ideal for hanging tools and other small items.
  • Invest in Drawer Units: These are great for storing smaller items and keeping them organized.
  • By carefully considering these planning, design, and construction strategies, you can transform your 8x12 lean-to shed into a highly efficient and spacious storage solution. Remember that a well-planned shed is an investment that provides long-term benefits in terms of organization, convenience, and protection of valuable possessions.

    Compact 6x8 Lean To Shed Plans for Limited Outdoor Spaces

    Compact 6x8 Lean To Shed Plans for Limited Outdoor Spaces

    Cramming Maximum Storage into a Tiny Space: 6x8 Lean-To Shed Plans for Small Yards

    Hey there, fellow space-challenged backyard enthusiasts! Let's be honest, finding enough storage space, especially when you're dealing with a postage-stamp-sized yard, can feel like trying to fit a camel through the eye of a needle. But what if I told you there's a surprisingly elegant solution? A compact 6x8 lean-to shed. It's the perfect blend of functionality and space-saving design, and this guide will walk you through building one yourself.

    Why a Lean-To Shed is Perfect for Small Spaces

    Unlike a freestanding shed that demands its own dedicated footprint, a lean-to shed cleverly attaches to an existing structure â€" your house, garage, or even a sturdy fence. This means it takes up significantly less ground space, making it ideal for tight yards. You're basically getting extra storage without sacrificing valuable square footage. The design itself is naturally compact, and it’s much easier to build than a full-fledged shed.

    Planning Your 6x8 Lean-To Shed

    Before you even grab a hammer, a little planning goes a long way. Think about what you want to store in your shed. This will influence your design choices.

    Choosing Your Location

    Finding the perfect spot is crucial. Consider these factors:

    • Proximity to your house: The closer, the better, especially if you'll be frequently accessing the shed.
    • Sunlight and shade: Think about how much sun your shed will receive throughout the day. Too much sun can heat up the inside, while too little can create a damp environment. A balance is ideal.
    • Accessibility: Ensure you have easy access to your chosen location. You don’t want to be navigating obstacles every time you need something.
    • Drainage: Avoid low-lying areas prone to waterlogging. Proper drainage is vital to protect your shed’s structure and contents.

    Material Selection

    The materials you choose impact both the cost and the longevity of your shed. Here are some popular options:

    • Pressure-treated lumber: Essential for the base and frame, as it resists rot and insect damage.
    • Plywood or OSB sheathing: For the walls and roof. OSB (Oriented Strand Board) is generally more affordable but can be less aesthetically pleasing.
    • Roofing material: Asphalt shingles are a common and relatively inexpensive choice. Metal roofing is a more durable, long-lasting option but can be more expensive.

    Design Considerations

    Even a 6x8 shed can be customized to meet your needs. Consider these features:

    • Door size and placement: Plan the door's size to accommodate the largest item you plan to store. Consider hinged or sliding doors, depending on available space.
    • Shelving: Incorporating shelves will maximize vertical space and allow for better organization.
    • Ventilation: Adequate ventilation is crucial to prevent moisture buildup and mold growth. Consider adding vents or louvers.
    • Windows: Adding windows not only improves ventilation but also provides natural light.

    Building Your 6x8 Lean-To Shed: A Step-by-Step Guide (Simplified)

    Building a shed involves multiple steps. We will only provide a simplified overview here. Always consult professional building guides and ensure you understand local building codes.

    Foundation

    Start with a level base, whether it's a concrete slab, gravel base, or pressure-treated lumber sleepers. Ensure it's sturdy enough to support the weight of your shed.

    Framing

    Construct a frame using pressure-treated lumber, following your chosen plan. Make sure it’s square and plumb before proceeding.

    Sheathing

    Attach plywood or OSB sheathing to the frame, creating the walls and roof structure.

    Roofing

    Install your chosen roofing material, ensuring proper overhang to protect the walls from rain. This is crucial for the shed's longevity.

    Finishing Touches

    Add the door, windows, shelving, and any other features you’ve planned. A final coat of paint or stain can add protection and enhance the appearance.

    Important Note: This is a simplified overview. You'll need detailed plans and potentially some carpentry experience. If you're unsure about any aspect of the build, consult a professional.

    Finding Detailed Plans

    While I've given you a general overview, you'll need detailed plans to build your shed. There are numerous resources available online, including:

    • Online shed plan websites: Many websites offer downloadable plans for various shed sizes and styles, including lean-to designs.
    • Home improvement stores: Local home improvement stores often carry shed plans or can point you towards helpful resources.
    • Architectural design services: For a more customized design, consider hiring an architect or designer to create bespoke plans.

    Remember to choose plans that suit your skill level and available resources. Don't be afraid to adapt plans to fit your specific needs and materials. And always, always check local building codes before you begin!

    Frequently Asked Questions

    Let's tackle some common queries about building your 6x8 lean-to shed.

    • Q: Do I need a building permit? A: Building codes vary by location. Check with your local authorities to determine if a permit is required for your project.
    • Q: How long does it take to build? A: The construction time depends on your experience, available tools, and weather conditions. It could take a weekend for experienced builders, or several weekends for novices.
    • Q: How much does it cost to build? A: Costs vary widely depending on materials, labor, and any additional features you include. Research material prices in your area for a better estimate.
    • Q: Can I build it alone? A: While possible for some people, having an extra set of hands makes the process significantly easier, especially during lifting and framing.
    • Q: What about insulation? A: While not strictly necessary, insulation can help regulate temperature and create a more usable space, particularly in extreme climates.
    • Q: What if I don't have much carpentry experience? A: Don't be discouraged! Start with simple projects to build your confidence, and take your time. There are many online tutorials and resources available to help you learn.

    Building your own lean-to shed is a rewarding project. It might seem daunting at first, but with careful planning and a bit of elbow grease, you’ll have a fantastic addition to your outdoor space. So get out there and start building that extra storage you’ve always wanted!