


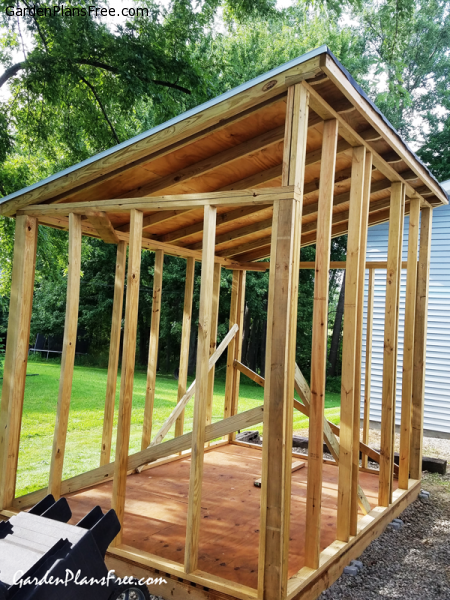
Building Your Own Simple & Affordable Lean-To Shed: A Weekend Warrior's Guide
So, you're dreaming of a little extra storage space, a workshop haven, or maybe just a cozy spot to escape? Building a lean-to shed is a fantastic project for anyone who wants a practical structure without breaking the bank or requiring advanced carpentry skills. This guide will walk you through building your own, focusing on simplicity, affordability, and â€" most importantly â€" making it a fun and achievable experience!
Planning Your Lean-To Shed: Dream Big, Start Small
Before you even think about grabbing a hammer, let's get the planning sorted. This isn't rocket science, but a little prep work goes a long way.
Choosing Your Location and Size
Think about where your lean-to will go. You'll need a sturdy wall to lean it against â€" your house, a garage, a barn, whatever's available. Measure the available wall space carefully. Remember, bigger isn't always better, especially for a first-timer. A smaller shed (say, 6ft x 8ft) is easier to manage and quicker to build.
Materials List: Keeping it Budget-Friendly
This is where you can really save money. You don't need fancy, expensive lumber. Pressure-treated lumber is a good choice for the floor and base because it resists rot. For the rest, regular lumber works perfectly fine. Consider scavenging for reclaimed materials â€" often you can find great deals (or even free!) wood on Craigslist, Facebook Marketplace, or even at local construction sites. Here's a basic list (quantities will vary based on your shed size):
- Pressure-treated lumber for the base and floor
- Regular lumber for the walls and roof
- Plywood for the roof sheathing
- Roofing material (tar paper, asphalt shingles, corrugated metal â€" choose what fits your budget and aesthetic)
- Nails, screws, and other fasteners
- Post anchors or concrete (if needed for extra stability)
- Level, measuring tape, saw, hammer, drill
Pro-Tip: Create a detailed list with specific quantities based on your measurements. This avoids costly trips back to the hardware store.
Construction: A Step-by-Step Guide
Alright, let's get building! Remember, safety first. Wear safety glasses, work gloves, and sturdy shoes. If you’re using power tools, familiarize yourself with their safety features.
Laying the Foundation
This is where your pressure-treated lumber comes into play. Build a simple frame on the ground, the same size as your shed's footprint. This frame acts as your base and will keep the floor level and prevent rot. Secure it with screws and make sure it’s level. If you're building on uneven ground, you may need to adjust the height of the base frame.
Building the Floor
Once the base is solid, attach your floorboards to the frame. Use pressure-treated lumber for this as well. Leave a small gap between the boards for expansion and contraction. This helps prevent warping and cracking.
Constructing the Walls
For a simple lean-to, you'll need just two walls. Cut your lumber to the correct height (consider adding a slight overhang for a little extra roof coverage). Assemble these walls using screws or nails, ensuring they are square and plumb. Remember to leave openings for doors or windows if you plan on having any. You can get creative here, but keep it simple. A single door often suffices.
Putting Up the Roof
This is the most important part. You’ll need to create a sloped roof to allow for proper water runoff. This can be a simple design â€" just a couple of angled rafters resting on the supporting wall and the top of your walls. Cover the rafters with plywood sheathing. Finally, install your chosen roofing material (asphalt shingles are a popular, budget-friendly choice). Remember to overlap the roofing material to prevent leaks.
Adding the Finishing Touches
Once the roof is on, you can add a simple door and any windows you’ve planned for. Consider adding some simple trim to neaten up the edges. A coat of exterior paint or stain will add protection and enhance the look. You can also add simple shelving inside to maximize your storage space.
Tips for Keeping Costs Down
Building a lean-to shed on a budget is achievable! Here are some money-saving tips:
- Use reclaimed materials: Look for free or discounted wood on Craigslist, Facebook Marketplace, or at local construction sites.
- Choose affordable roofing materials: Tar paper or corrugated metal are cheaper than asphalt shingles, although asphalt shingles offer a more traditional look.
- Buy in bulk: Purchasing materials in larger quantities can often save you money.
- Borrow tools: If you don't own all the necessary tools, see if you can borrow them from friends or family, or rent them from a hardware store.
- Do the work yourself: This is the biggest cost saver! Building it yourself means you only pay for materials. Though if you're not confident in any aspect, it's worthwhile to consider help from a professional for that part only.
Commonly Asked Questions
Q: Do I need a permit to build a lean-to shed?
A: Permit requirements vary depending on your location. Check with your local building department before starting the project. Small, simple lean-tos might not require a permit, but it's best to be sure.
Q: How long does it take to build a lean-to shed?
A: A weekend is possible for a small shed, but it depends on your experience and the complexity of your design. Allow ample time for each step and don't rush the process.
Q: What kind of foundation do I need?
A: A simple frame made of pressure-treated lumber is usually sufficient. For uneven ground, you may need to adjust the frame height or use concrete footings.
Q: How can I make my lean-to shed more weatherproof?
A: Ensure proper roof overhang, use a high-quality roofing material, and seal any gaps or cracks. Consider adding weather stripping around the door.
Q: Can I build a lean-to shed against a brick wall?
A: Yes, but ensure the wall is sturdy enough to support the weight of the shed. You might need to use additional bracing or anchors to secure the shed to the wall.
Building a lean-to shed can be a rewarding experience. It's a practical project that can add value to your property and boost your DIY confidence. So grab your tools, gather your materials, and let the building begin! Remember to enjoy the process â€" it’s as much about the journey as the destination!
0 comments:
Post a Comment
Note: Only a member of this blog may post a comment.